

In the case of welding projects, the arrangement and the accessibility of your tools are of utmost importance for the efficient and successful completion. A properly made welding cart is not only a storage solution but it also serves as a piece of equipment that makes the plasma cutter, the welder and the accessories very much available and also improves the overall mobility and safety. Why waste hundreds of dollars on a pre-assembled welding cart when you can produce your own DIY weld cart that fits your needs perfectly? This blog entry will take you step by step through the whole process from designing to constructing of your custom welding cart. You will be introduced to the whole range of materials and features you will need to learn about to make a solution that is both functional and cost-effective and that will most certainly make your welding work easier and more pleasant. It does not matter if you are a basic beginner DIYer or an experienced fabricator, the tips and inspiration in this guide will lead you to the beginning of your journey.
Understanding the Basics of a Welding Cart
What is a Welding Cart?
The welding cart is a specific kind of apparatus that is used for the organized and effective holding and transportation of the welding tools, accessories, and gas cylinders. It usually has shelves or compartments to keep a welder, cables, and consumables, along with places for the gas tanks. The welding carts are fitted with wheels or casters, which make them movable and easy to handle in workshops or on job sites. The carts can be of different sizes and designs, where the types range from compact and light options for hobbyists to heavy-duty models meant for industrial use. An efficient cart for welding not only provides storage for all equipment securely but also enhances the overall safety by keeping the tools easy to hand. There is an interesting variety in features today, like adjustable shelving or built-in cable holders, that give welding carts a big just for anybody who is welding frequently.
Benefits of Having a DIY Welding Cart
A DIY welding cart made by you comes with a lot of advantages consisting of economic aspects, personalization, and useful factors. If you make a cart yourself, you can only create one that exactly occupies the space in your workshop and meets your individual welding requirements. You design it with all the handy features like adjustable shelves, tool holders made to fit your tools, and gas tank and cable compartments that will take care of your efficiency and organization to the maximum. Besides, a DIY solution usually is much cheaper than pre-made cart purchases giving you the opportunity to invest into other necessary tools or equipment. As per the recent search data, customized workshop projects like DIY welding carts are increasing in popularity among welders as they provide a feeling of achievement and are also a nice outlet for one’s creativity. In the end, making your own welding cart combines usefulness with personal creativity, thus being a great option for both professional and hobbyist users.
✓
Key Benefits of DIY Welding Carts
- Cost Savings: Significantly cheaper than pre-made commercial options
- Customization: Tailored exactly to your workspace and equipment needs
- Enhanced Organization: Custom compartments for all your specific tools and accessories
- Personal Satisfaction: The pride of building your own functional workshop equipment
- Flexibility: Easy to modify or expand as your needs change
Common Materials Used in Weld Carts
When you are planning to build a weld cart, the selection of materials to be used is the utmost important issue. It can help you to ensure the durability, functionality, and affordability of the especially weld cart. With the help of the most recent search engine trends data, it can be revealed that welding enthusiasts still prefer to use materials like steel, aluminum, and reinforced plywood for their projects. The main reason for steel being a very common choice is its high tensile strength and heat resistance, which together, make it the only option for heavy equipment support. On the contrary, aluminum is lightweight and resistant to corrosion thus encouraging its use in transportable and outdoor applications. Reinforced plywood is a budget-friendly option for hobbyists, as it is strong enough and not very expensive especially when coupled with metal brackets for extra support. In the end, the type of material will depend on the individual’s requirements like the weight that can be supported, mobility of the cart, and environmental conditions of usage; this personal touch is what makes DIY weld carts so attractive.
Design Variations: Vertical vs. Horizontal Layouts
Advantages of Vertical Welding Carts
Vertical welding carts are equipped with a multitude of benefits that are designed to meet functionality and space saving. To begin with, the main point is that their vertical design takes up very little space, hence they can be conveniently used in workshops with tight spaces. This arrangement lets the user put on the same level the tools, the welding equipment, and even the gas cylinders, while still being able to reach each item quite easily. Moreover, vertical carts are often made in a way that they are small in size but very stable at the same time, able to take in heavy weights and still be strong and durable.
Current findings indicate that vertical welding carts have gained popularity among users mainly for their ergonomic advantages; they allow for less bending and reaching, thus making the work easier and less tiresome for the welders. There is also the factor of their superior mobility, allowing them to be moved easily even in cramped workshop areas. Consequently, with the ever-increasing need to make the best use of the available workspace, vertical welding carts have emerged as the pick of the trade by professional welders and the hobbyists alike.
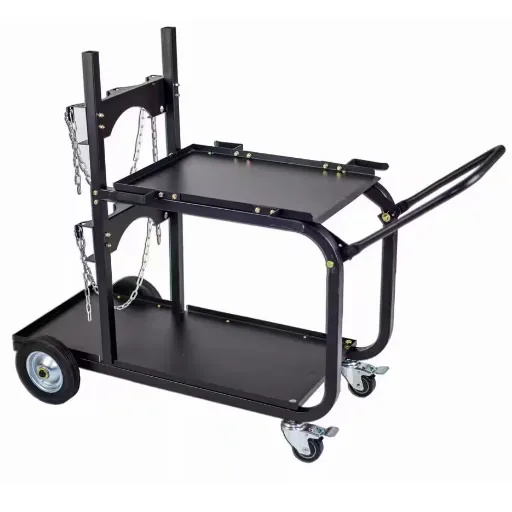
Benefits of Horizontal Welding Carts
Horizontal welding carts are primarily characterized by their focus on stability and storage capacity, hence they can be very beneficial to a well-equipped workshop considering their extensive floor space. One main positive aspect is that they can support large welding machines and their ancillary devices since the welding carts usually the broadest and most spacious design. This granted space is of great help for welders to arrange their tools, gas cylinders, and other equipment in a more efficient manner. Besides, the construction of the cart also allows for having a lower center of gravity which in turn leads to the reduction of the tipping risk, especially when heavy equipment is moved across rugged surfaces.
As per latest trends and search data, the users are the ones who point out the feature of horizontal welding carts to be customizable, stating that they can fit various workshop needs. A good number of carts are provided with extra shelves or drawers, so that very good organization and accessibility can be achieved during the project. These carts are particularly appreciated in those cases where mobility is of less importance and a strong and solid platform is of great necessity. Horizontal welding carts have not only managed to survive but are also thriving among industrial settings or long-term station-based usage as they are the best option for welders who are looking for storage and stability.
Vertical Cart Highlights
- Space-efficient design
- Ergonomic accessibility
- Superior mobility
- Ideal for tight workshops
Horizontal Cart Highlights
- Maximum stability
- Greater storage capacity
- Lower center of gravity
- Perfect for stationary work
Choosing the Right Design for Your Needs
When it comes to finding the right design for a welding cart, first of all, it is necessary to analyze what are the particular requirements and working conditions. According to the findings of the search trends, the users give more priority to mobility, weight capacity, storage options, and durability among the aspects are often the most searched ones. If in your workplace frequent moving is a must, vertical welding carts are the hardest to find because of their small size and easily portable nature. On the contrary, horizontal welding carts always get selected in case of a stationary workplace for their stronghold and of the tool and material space. Merging your requirements with the above-mentioned trending preferences, you will be able to easily pick a design that helps you perform your tasks quicker and better organized.
Materials and Tools Required to Build a Welding Cart
Essential Materials: Steel Tubing, Angle Iron, and More
In the case of a welding cart, the choice of materials is very important and it will affect the cart’s durability and usability at the same time. The main part or frame of the welding carts is usually made from steel tubing because of their strongness and ability to support the weight. Besides, angle iron is another important material, as it can provide the basis for new shelves or support brackets and it is easy to work with while doing it. Other than those materials, caster wheels, sheet metal for storage trays and heat-resistant paint are among the materials that make the cart mobile, practical, and long-lasting.
In light of latest search trends, many DIY enthusiasts are seeking lightweight options like aluminum tubing to make portable carts that are stable at the same time. Yet, steel still takes the lead as the most searched and liked material because it offers a good mix of price, availability, and strength. Being aware of such preferences will not only help you in making your material selections but also in providing a welding cart which is, to a certain extent, very personalized to your requirements and at the same time trendy.
📋 Complete Materials Checklist
- Steel tubing (square or round)
- Angle iron for supports
- Heavy-duty caster wheels
- Sheet metal for trays
- Heat-resistant paint
- Metal primer
- Bolts and fasteners
- Welding consumables
Tools You Need: Saw, Welder, and Additional Equipment
The right tools are essential when building your welding cart. Besides, the right tools will enable you to achieve the desired product in terms of functionality and durability. The latest info from search engine indicates that searches for tools such as metal-cutting saw and welder are on the rise among DIY welders, thus highlighting their importance in the project. A metal-cutting saw helps in accurately cutting the steel or aluminum tubing to the exact lengths that the cart structure will be balanced and safe. As for the welder it is the spine of the whole project, as it allows the pieces to be securely and efficiently connected. The need for tools like clamps, measuring instruments, and protective gear (leather gloves, welding masks, etc.) has been reflected in the search volume, implying that they play a significant role in precision and safety. Therefore, these tools bring together the bases for custom welding cart building, meeting your requirements and following the current design trends.
🔧 Essential Tools List
Cutting Tools:
- Metal-cutting saw
- Angle grinder
- Plasma cutter (optional)
Welding Equipment:
- MIG or TIG welder
- Welding rods/wire
- Welding clamps
Measuring Tools:
- Measuring tape
- Speed square
- Straight edge
Safety Gear:
- Welding mask
- Leather gloves
- Safety glasses
Understanding Load Capacity and Stability
When building a custom welding cart, the knowledge of load capacity and stability is a must for both safety and performance. According to recent search trend data, many DIYers and professionals are often the ones who take these factors into consideration first when designing the product. The term load capacity gives the maximum weight that the cart is able to hold with no loss of its stability as the cart structure would be then. To find this out one has to consider the total weight of all welding equipment, tools, and accessories which are meant to be used on the cart.
The term stability includes such a design feature as wheel placement and center of gravity in addition to the cart’s height and width. A broad base and proper weight distribution are major factors in fighting tipping over or breaking during use. Besides, heavy-duty caster wheels coupled with steel frame material are the main search terms reflecting the topic of durability. By recognizing these aspects you can easily construct a welding cart that is not only tailored to your needs but also in conformity with the best design trends that were pointed out in the last search trends.
⚠️ Critical Safety Factors
- Calculate Total Weight: Account for all equipment, tools, and accessories
- Wheel Rating: Choose casters rated well above your maximum load
- Center of Gravity: Keep heavy items low and centered
- Base Width: Ensure a broad base to prevent tipping
- Locking Mechanism: Install brakes on at least two casters
Step-by-Step Guide to Building Your Welding Cart

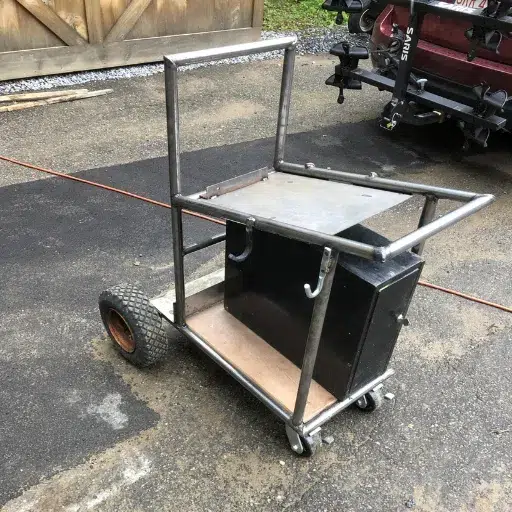
Measuring and Cutting the Tubing
Creating a stable and effective welding cart will not be possible without precise measurements at the very start. The dimension of the cart you will be building is going to be dictated by the welding equipment and accessories that you are going to use. Use a measuring tape to make the necessary measurements and write down the length, width, and height of your welding machine, gas cylinder, and other tools that you may want to store. After that, mark these dimensions clearly on the steel tubing before cutting, this way you are guaranteed to have the right measurements.
The search data shows the latest trends and the most asked questions reveal that many are looking for methods to achieve clean, straight cuts among the factors affecting it. One of the main factors is the use of the best cutting tools like metal-cutting blade for an angle grinder, a cold saw, or a tube cutter is the best depending on the material and thickness of the tubing. A clamp should be used to hold the tubing in place, which is another worry coming from the public through searches, cutting movement at an unwanted location will be reduced. These thoughtful steps will result in properly measured and accurately cut tubing which is the first step to making a welder cart that is properly balanced and durable for long.
📐 Measuring Best Practices
- Measure Your Equipment First:
Document dimensions of welder, gas cylinders, and all tools to be stored - Add Clearance Space:
Include extra space for cable management and easy access - Mark Clearly:
Use a permanent marker or scribe to mark cut lines on tubing - Double-Check Before Cutting:
Measure twice, cut once—verify all measurements before proceeding
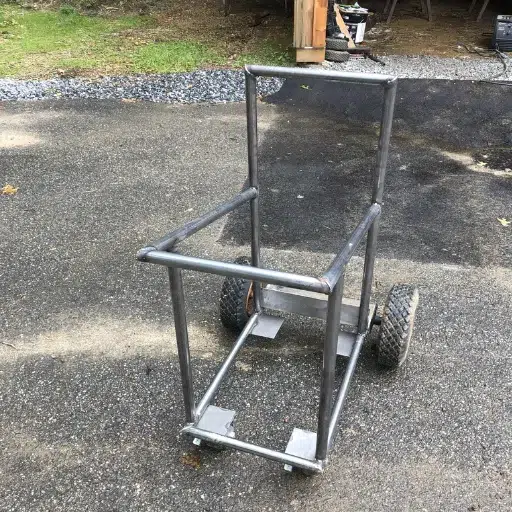
Assembling the Frame: Tips and Techniques
While the welding cart frame is being put together, the aspects of precision and stability are going to be the factors that directly affect the quality of the final product, lasting and functional. Based on the latest trends and concerns found on the search engine’s queries, one of the major issues is how to align the pieces accurately and then put them together. To get to a solution, you are advised first to spread out all the pieces that you have cut on a flat and level surface so that you can check their dimensions and alignment. Use the clamps or magnetic squares to keep the parts in their places while assembling, as this will help to stop any movement during the process of welding or fastening. It is also suggested that first, tack weld the joints and then do the full welding, in this way adjustments can be made if needed. If the assembly is done with the bolts, then make sure that the tightening of all the bolts has been done equally to preserve the structural integrity. These techniques will not only reduce the time taken for the assembly process but will simultaneously lead to a situation where the errors are less likely to occur and consequently a sturdy and balanced cart is produced.
✅ Assembly Tips for Success
- Work on a Level Surface: Ensures proper alignment and prevents warping
- Use Clamps Liberally: Secure all joints before welding to prevent movement
- Tack Weld First: Make small tack welds before full welding to allow adjustments
- Check Squareness Regularly: Use a speed square to verify 90-degree angles
- Weld in Sequence: Alternate welding locations to minimize heat distortion
- Allow Cooling Time: Let welds cool naturally to prevent warping
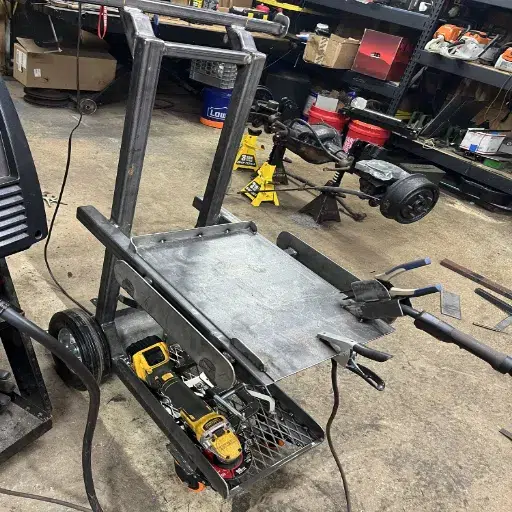
Adding Shelves and Castor Wheels
To add shelves to your cart, first, take measurements and then cut the material for the shelves so that it fits the frame. Most common materials used are metal, wood, and heavy-duty plastic, depending on the cart’s intended use. Attach the shelves firmly with screws, bolts, or welds, and check that they are at the same height for the even distribution of weight. For carts that are going to be lifting weights that are heavy, it would be a good idea to use metal brackets to reinforce the shelves for extra support.
The addition of caster wheels to the base of the cart not only improves mobility but also makes the cart more versatile. Select wheels that are compatible with the cart’s weight capacity and the surface it will be placed on. Swivel casters with brakes are advised for having less effort in moving and having more stability when not moving. Secure the casters by using either bolts or welds at the four corners of the cart base which will avoid any rocking of the cart. Recent findings in the search data indicate that the suggestion of using polyurethane wheels is the most preferred one, as they will last longer and also ensure a smooth movement on different surfaces without damaging the floors. If you follow these steps, you will end up with a cart that is very practical and can handle many different tasks due to its high functionality.
🛞 Caster Wheel Selection Guide
- Weight Rating: Choose casters rated for at least 25% more than your total load
- Wheel Type: Polyurethane wheels offer durability and floor protection
- Swivel vs. Fixed: Use 2 swivel (front) and 2 fixed (rear) for best maneuverability
- Locking Mechanism: Install brakes on at least 2 wheels for safety
- Wheel Size: Larger wheels (5-6 inches) roll more easily over obstacles
Finishing Touches: Paint and Customization
Picking the Best Paint for Metal
The first thing to look for when choosing paint for the metal surface is the paint’s durability. Also, the paint’s resistance against rust, and lastly, the paint’s aesthetic value are the major factors to consider. Based on the newest information from the search engine, epoxy-based or enamel paints seem to take the lead as the best bets for metal. Epoxy paint grants extraordinary adhesion and wear-resistance; thus, it is perfect for such places where there is constant and heavy use. The enamel paint is preferred for the bright and the shiny look but also provides the long-lasting protection of the scratched or weathered metal surface underneath. A primer for metal should be applied before painting to make the paint stick properly and also to give even coverage. The combination not only improves the durability of the paint job but at the same time, it also prevents rust and corrosion, thereby prolonging the life of your metal surfaces considerably.
🎨 Paint Application Process
- Surface Preparation:
Clean with acetone or degreaser, remove rust with wire brush - Apply Primer:
Use metal-specific primer for better adhesion and rust prevention - Paint Application:
Apply 2-3 thin coats of epoxy or enamel paint, allowing drying time between coats - Curing Time:
Allow full curing time (24-48 hours) before loading equipment
Adding Features to Your Cart
The addition of features to your cart can make it more versatile, functional, and customized to your particular needs. But, what are the most popular add-ons for utility carts according to the most recent search data? Among the popular modifications are the installation of durable caster wheels for silky mobility, adding foldable shelves for the option of adjustable storage, and equipping carts with built-in tool racks or hooks for better organization. For outdoor application, waterproof covers and UV-resistant materials are the most searched upgrades in this category. Also, many users have made it essential to have ergonomic handles or grips that are enhancing the ensure comfort during the use that is taking long. Besides, these modifications are usability boosters they are also the source of the cart being overall durable and efficient.
Storage Enhancements
- Tool hooks and racks
- Cable management holders
- Drawer compartments
- Gas cylinder brackets
Mobility Features
- Ergonomic push handles
- Locking caster wheels
- All-terrain wheels
- Tow hitch attachment
Work Surface Additions
- Fold-out work table
- Vise mounting plate
- Ground clamp post
- Power strip holder
Cart Maintenance Tips for Longevity
To prolong your cart’s life, you should not skip regular maintenance. As per the latest data from the search trends, the focus of the searches is on the prevention of the wearing and tearing most of the time. Start with frequent cleaning of the cart to eliminate dirt, debris, and moisture that can cause rust, especially if the cart is most of the time used outdoors. Moving parts, for instance, wheels and hinges, should be lubricated so that they work smoothly and that the components are not strained. Check for any bolts or screws that might be loose, tighten them as soon as possible to avoid the instability of the structure. In case your cart is kept outdoors, think of putting weatherproof covers over it as a safeguard against UV rays and harsh conditions. Moreover, the replacement of worn or damaged parts like casters or shelves is a very common and highly searched query that if answered can help to extend the lifespan of carts. If these simple routines are implemented, then the cart’s durability and reliability will over time grow to be significantly large.
🔧 Regular Maintenance Schedule
| Frequency | Maintenance Task |
|---|---|
| Weekly | Clean surfaces, check wheel function |
| Monthly | Lubricate moving parts, tighten bolts |
| Quarterly | Inspect for rust, touch up paint |
| Annually | Replace worn casters, check structural integrity |
Frequently Asked Questions (FAQ)
How to construct a welding cart machine for my workshop?
To begin with, the first thing you have to do is design a strong and rigid frame that can hold all your welding equipment and have a place for a bench or table to work. The most common materials for this kind of cart are square tubing, and if you want to make it more affordable, you can use scrap metal or a wooden panel for the shelves. Also, mark the cut lines with a speed square. If you want a cart for the MIG and TIG, remember to consider the space for the hoses, rod or wire spool, and the spare tank if you use gas. Then, drill holes for the clamps of the workbench and plate on the bottom center for the load to be distributed thus making it stable when it rolls on the shop floor. Most builders get their wheels from a local hardware or a Harbor freight store and put them with round bearings for easy rolling.
What welding techniques can be used when making a DIY welding cart?
It is better to tack weld at more than one point in order not to distort the square tubing in the process of making final welds. Depending on your skills, you can use a stick or MIG; Lincoln or Miller can be the machines with which you will get reliable arc control for tacks. Have extra rod and filler wire, and hammers, and speed squares for corners and checking squareness before final welding. If you have a press or a drill press, then use it for preparing holes for the bolts that will give rigidity to the frame without full welding. Scrap or test panels should be available for the purpose of adjusting the machine and getting familiar with tacks before you start working on the cart frame.
How to cut metal for a welding cart machine, and then tack it?
Cutting for a cart usually is done with a band saw, cutoff saw, or plasma cutter like a Hypertherm for a faster and easier process, and you can then finish the edges with a grinder to remove any burrs. If precision is crucial, lay parts on a drill table or CNC-cut panel, and drill holes for mounting caster plates and shelf supports. After dry-fitting all the parts and confirming their alignment with a speed square and straight edge, you can start tacking. Use MIG for fast tacks, or TIG for nice and controlled temperature on stainless, and be sure to have some extra consumables, such as nozzle, hose, and rod, close by. Once tacking is done, measure again and make any necessary corrections before performing continuous welds to finish up the frame.
Can a wheel and shelf system carry a heavy load in a DIY welding cart?
Choose casters having a weight rating far greater than what your total load will be and attach them to either a reinforced bottom plate or a casters’ box in order to not let the weight cause pull-out. Place the welder and gas bottles, which are the heaviest items, at the bottom of the cart, up to the center of the wheelbase and this way you will not tip during the move. Use thicker shelf material like steel plate or reinforced wood and install the shelves with through-bolts which will give the frame more strength. You might want to have a locking caster and a wheel chock or bracket for transport to keep the cart secure during movement. Additionally, if you intend to bring along extra equipment such as a MIG and TIG setup, leave enough space for spare parts, a drill, and tool storage, all while ensuring ventilation for machine cooling.
Why don’t I just leave the cart in stainless-steel finish instead of paint?
Painting creates a barrier against rust for mild steel carts and also gives a sleek look, but it is possible for stainless steel parts to be left unpainted for their corrosion resistance and cleaner aesthetic. However, if you are to paint one, make sure that you are using a high-temp primer followed by an enamel paint suitable for workshop environment and do not forget to cover the areas that come into contact with electrical connections or gas hoses. If a stainless-steel top or shelf is to be used, then it should directly be cleaned with acetone, and in case the cart is going to be positioned in corrosive conditions, then a passivation step is advisable. Furthermore, paint can be used to cover up weld marks and at the same time provide a surface that is easy to apply shop labels on, but you must be careful to allow the full curing time before loading any sensitive equipment. It is a good idea to keep extra paint and a touch-up brush convenient for repairing any chips resulting from hammering or moving over uneven floors.
Ready to Build Your Custom Welding Cart?
Making a welding cart by your own hands is a project that not only gives you a useful tool but also allows you to show off your skills as a designer. If you stick to this detailed instruction, you will not only get the solution that is the best match for your workshop requirements but also save some bucks and collect valuable experience in fabrication. No matter if you pick an upright or a sprawled shape, the vital point will be meticulous planning, accurate carrying out, and paying full attention to safety and stability. After having the proper supplies, instruments, and methods, a welding cart professional standard will be there at your service for many years since then.
Pro Tip: Start with a simple design for your first cart, then add custom features as you gain experience and identify your specific workflow needs.
Reference Sources
- IWS Education – DIY Welding Cart Build Plans: This resource provides a collection of welding cart blueprints and tips for building your own cart, focusing on improving welding skills and workshop organization. DIY Welding Cart – DIY Build Plans
- Core.ac.uk – Design and Fabricate Welding Machine Cart: An academic paper discussing the design and fabrication of a welding cart, including materials like mild steel and stainless steel, and features for gas cylinders and wire compartments. Design and Fabricate Welding Machine Cart
- Knoxville Inspections – Parweld TIG Trolley: A detailed guide on the benefits and features of a professional welding trolley, suitable for both DIY enthusiasts and professional welders. Parweld TIG Trolley Set
- welding projects guides


