
Welding art projects can be an exciting and creative way to channel your ideas into reality, no matter if you are a total beginner or someone wanting to master a new hobby. This all-in-one guide is prepared for the greenhorns who want to know about the basics of welding while making one-of-a-kind, artistic projects. From tiny ornamental things to practical items for the home, we will lead you through easy DIY ideas that not only improve your welding ability but also support your artistic expression. When all is said and done, you will have the combination of inspiration and practical know-how to begin making gorgeous and customized art pieces—all with the help of welding.
What Are Some Simple Welding Project Ideas for Beginners?
There is great value in confidence-building and acquiring basic skills in DIY welding, and for beginners, the starting point is simple welding projects. This is particularly the case for the sample suggestions that also emphasize practicality.
- 1Metal Bookends: A decorative function of bookends can be accomplished with welded small metallic plates or rods, which can be called metal bookends. A minimalistic approach is needed as fewer materials are required with maximum productivity.
- 2Bottle Openers: Using flat metal as well as performing clean welds can make a very elegant as well as basic bottle opener. It is a very good small-scale exercise as well, and focuses on precision.
- 3Garden Trellis: Steady welding of metal pieces like steel rods or even pipes can create a frame needed for climbing plants. This enhances the proficiency of welding and attending to longer as well as bigger pieces of metal.
- 4Tool Rack or Organizer: A practical approach for cluttered workstations is a metal sheet or bar-based, simply designed organizer.
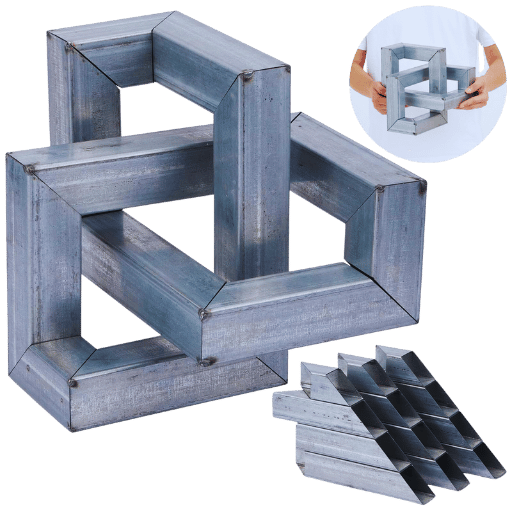
- 5Decorative Wall Art: Get creative and make use of scrap metal pieces by welding them together to form unique wall art. It is a strong method of metalwork to create art and get creative with DIY welding.
Key Takeaway: These beginner-friendly projects are straightforward, require basic tools, and help you gain essential welding experience while producing useful or decorative items.
How to Start with Easy Welding Projects
When it comes to simple welding projects, the most important phase includes getting the right tools and the right materials. First, get other necessary equipment like a TIG welder, safety gear, and metal pieces for your DIY welding project. After that, look at simple designs and practice the most basic techniques like fusion and beads, on scrap metal. Always be mindful of safety, so it’s a must to work in a well-ventilated area and to follow the guidelines properly. Beginning with small projects will gradually increase your confidence and improve your skills.
Essential Welding Tools for Beginners
The list includes the most important tools that a starter welder ought to possess in order to facilitate balance, dexterity, and limb safety.
📋 Beginner’s Welding Tools Checklist
- ✓ Welding Machine: Suitable for novices, a MIG or stick welder would compartmentalize the whole process within a single unit.
- ✓ Safety Gear: Shielding wear, welding gloves, safety glasses, flame-resistant uniforms, and the exhaust ventilator are used to protect against the effects of heat and sparks, and welding fumes.
- ✓ Clamps: These are used to secure and immobilize pieces of metal and other substrates in welding positions.
- ✓ Wire Brush: Used for cleaning and preparing metal surfaces before welding to achieve a quality weld.
- ✓ Measuring Tools: A measuring tape and a square to ensure accurate and correct cuts to enhance the welds.
- ✓ Ground Clamp: Properly grounding the equipment augments welding safety and ground welding effectiveness.
Choosing the Right Metal Pieces for Your Project
Choosing the right metal parts for your project is a fundamental thing to do for the sake of both structural integrity and functionality. Start by spotting the metal type that is appropriate for your case. In the case of projects needing strength and longevity, like building frames or applying steel or stainless steel tools, these are the metals that are recommended. If your project is lightweight or if you require noncorrosive properties, then aluminum is the better choice. Be sure that the thickness of the metal corresponds to the needs of your design so as not to suffer from instability issues. Moreover, make sure to check material compatibility when different metals are used together, as it will help to avoid problems such as galvanic corrosion. Using quality, defect-free materials will not only contribute to making the project successful, but it will also ensure that the project lasts longer when it comes to metalwork.
How Can I Create Scrap Metal Art at Home?

Gathering and Preparing Scrap Metal
- Identify a Reliable Source: Collect scrap metal from construction sites with advanced permission, recycling shops, or even old trash. Collect the appropriate kind of scrap metal that are not hazardous and which can be used for the intended purpose of the project.
- Clean the Scrap Metal: In order to achieve the most suitable finishing, every metal needs to undergo removal of rust, grease, and other soft-set contaminants using a wire brush, water, or other appropriate cleaning agents.
- Sort and Categorize: Breakdown the metal collection into respective the respected categories, such as steel, aluminium, copper, and even other categories, ensuring that the model utilizes are consistent.
- Inspect for Damage: Depending on the requirements of each project, it is important to remove pieces that are structurally unsound, not only to ensure the overall cost of production, but also for the safety considering for the project for the user.
- Prepare Tools and Equipment: Equipment would include line along safety epaulet tools, such as: gloves, safety glasses, and goggles alongside tools for welding, contraction or erecting.
Basic Welding Techniques for Scrap Art
Basic welding techniques for scrap art involve selecting the right tools, practicing on similar materials, and mastering methods like MIG, TIG, and stick welding for clean and precise results.
| Key Point | Details |
|---|---|
| Welding Types | MIG, TIG, Stick |
| Tools Needed | Welder, Grinder, Clamps |
| Safety Gear | Helmet, Gloves, Jacket |
| Metal Types | Steel, Aluminum, Copper |
| Workspace | Ventilated, Fire-safe |
| Preparation | Clean, Align, Clamp |
| Practice | Scrap Metal, Regularly |
| Finishing | Grind, Polish, Patina |
| Creative Designs | Sculptures, Wall Art |
| Skill Building | Classes, Experimentation |
Design Ideas for Rustic and Decorative Pieces
Crafting rustic and ornamented pieces of metalwork requires the integration of time-honored techniques with modern design elements. Artisans can create unique, removable and irreplaceable finishes from steel, copper, and other metals using their natural textures and patinas. Below are creative sketches and aspects to consider while designing such pieces:
1. Accents of Rustic Furniture
The rustic metal furniture includes table bases, chairs, and shelves, and employs distressed steel and/or oxidized copper. The combination of wood and metal, such as a solid wood table top paired with welded steel legs, is highly sought after for its aesthetics and durability.
Market Insight: The global market for industrial furniture is projected to grow at a CAGR of 6.2% from 2022 to 2027.
2. Decorative Wall Art
Wall sculptures made with metal layers and incorporating geometric shapes or nature motifs such as leaves and animals, embellish the space. The decorative use of weathered fins, such as rust and brushed metal, adds depth. Designs with recycled or upcycled metal parts align with the sustainable trend.
3. Garden and Outdoor Elements
Sculptures and ornamental features like gates, trellises, and planters can be realized in rustic metal. For outdoor art, corten steel and similar weathering metals, which gain a protective rust patina, are especially appreciated.
Value Impact: It has been shown that including metal art in gardens can increase the total value of the property by as much as 15%.
4. Lighting Fixtures
Welded metal construction has given rise to handcrafted functional and ornamental pieces like chandeliers, pendant lights, and sconces. There is a substantial desire for the pieces, which highlight intricate patterns of metalwork or cross-sectioned industrial pipes, as well as the cozy, diffused light they generate.
5. Personalized Home Accents
The metal name plates, key holders, and clock frames are an exceptional addition to home déco,r albeit small customized pieces. Advanced procedures, such as laser cutting and welding, create detailed pieces in an effective manner. Homeowners continue to value and invest in personalized home accessories alongside distinctive artistry.
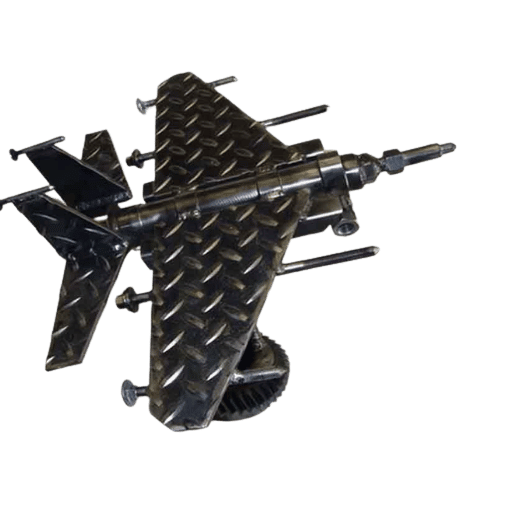
6. Sculptural Artworks
Large, free-standing sculptures designed for indoor and outdoor use are additional pieces. These pieces provide the artist with the opportunity to play with their imagination. Organic and flowing shapes can be created with the technique of MIG welding. The addition of other materials, such as glass or stone, provides contrast and texture. In modern minimalist spaces, sculptural art has become an integral piece.
Professional Tip: As with other forms of modern metallurgy art, metal provides opportunity in blended art forms with personalized approaches. Creating such bronze sculptures requires technique, art, and craftsmanship. Always with constant shaping and design, whether in the form of welding, shaping, or grasping other methods, updated consumer expectations evolve. Crafting such pieces honed distinct welding skills.
What Are Some Popular Welding Project Ideas Using Horseshoes?
Making a Horseshoe Dutch Oven Holder
The very first step in making a horseshoe Dutch oven holder is to weld three or even four horseshoes together in a way that will create a stable base by using the DIY welding techniques. You can strategically place the horseshoes either in a circular or triangular formation to achieve maximum equilibrium. Then, you need to weld strong metal rods or more horseshoes vertically as the supporters that will take the Dutch oven’s weight. The measurement and the placement of the supporters should be done such that they can hold the oven securely, depending on its weight and size. Finally, before the holder is put into use, it is necessary to smooth out all the sharp edges and to apply a heat-resistant finish that will give the holder durability and functionality.
Creating a Geometric Metal Sculpture
Geometric metal sculptures can be made by starting with a metal that lasts, which may be steel or aluminum. You can then visualize the sculpture by hand-drawing or using a computer-aided design program to get the exact geometric shapes and sizes. For instance, plasma cutting or shearing metal can be done with these tools to get the shapes needed. Welding or fastening can be used to join the parts together, with careful positioning done to ensure that the sculpture is stable. The sculpture can then be made to look more attractive and at the same time, invulnerable to rust by polishing its surface and applying a protective coating. In any case, safety must come first; thus, the use of proper protective gear and the choice of a well-ventilated location for work should be observed.
Building a Wine Bottle Holder from Horseshoes
🔨 Step-by-Step Construction Guide
Step 1: Prepare the Horseshoes
Clean the horseshoes thoroughly to remove any dirt, rust, or debris. Use a wire brush or sandpaper for best results.
Step 2: Design the Layout
Arrange the horseshoes in the desired configuration for holding wine bottles. A basic design typically includes vertically aligned shoes for stability and angled ones to cradle the bottle.
Step 3: Weld the Pieces Together
Secure the horseshoes in place and weld them together at the intersections. Ensure the frame is stable and able to support the weight of a bottle.
Step 4: Smooth the Surface
Grind and smooth down the welds and rough edges to achieve a polished finish and avoid safety hazards.
Step 5: Apply a Protective Coating
Add a protective layer, such as paint or clear sealant, to prevent rust and improve the appearance.
Step 6: Test the Holder
Once complete, test the holder with an empty wine bottle to confirm stability and functionality, ensuring it meets the standards of a fun project. Adjust if necessary.
Project Result: By following these steps, you can create a durable and visually appealing wine bottle holder from upcycled horseshoes.
How to Make Metal Art Using Sheet Metal?
Choosing the Right Sheet Metal for Your Project
Factors like the type of material to be used, its thickness, and the purpose of the project will dictate the selection of the sheet metal for your project. The most frequently used materials are aluminum, steel, and copper, and each has its distinctive attributes. Aluminum is light and resistant to corrosion, which makes it a perfect choice for outdoor or decorative applications. Steel is strong and durable and suitable for structural projects. Copper is attractive and mostly used in art or architectural designs. Choose a thickness that provides the necessary strength and at the same time, allows some flexibility depending on the project’s needs. Always check that the material will work with the tools and methods you intend to use.
Exploring Plasma Cutting Techniques
Discarding the preconceptions that plasma cutting is inefficient, one can reduce the cutting time for a section of a semicircle from 10 minutes to 7 seconds over a 600 mm 10 mm thick stainless plate. This serves to show the significant differences in cutting time for not very intricate designs.
| Key Point | Details |
|---|---|
| Definition | Cutting with superheated plasma |
| Materials | Conductive metals (steel, aluminum, etc.) |
| Process | Electric arc + compressed gas |
| Advantages | Speed, precision, versatility |
| Applications | Automotive, aerospace, DIY projects |
| Setup Needs | Power, air, torch, safety gear |
| Techniques | Steady torch, smooth movement |
| Safety | Eye, hand, and fire protection |
| Cost | $3,000-$30,000 (varies by type) |
| Automation | CNC for precision and efficiency |
Tips for Designing Decorative Metal Art
💡 Professional Design Tips
- ✦ Design Planning: Initiate the plan by doodling or drawing the piece to get an insight into the final design and guarantee proportional relativity among all the components. Take advantage of CAD programs for greater accuracy.
- ✦ Selection of Materials: Choose metals appropriate to the design style and purpose of the artwork. Use steel if the piece needs to be sturdy and copper for a more aesthetically pleasing sculpture.
- ✦ Contextual Considerations: If the piece will be placed or displayed outside, consider the effects of weather, temperature, and humidity on the sculpture.
- ✦ Tools and Devices: Get the necessary equipment and machinery, such as plasma and laser cutters to achieve intricate detail and clean edges.
- ✦ Neatness and Order: Apply protective equipment, including gloves, eye goggles, and a respirator during the cutting, welding, and finishing processes of the sculpture to ensure your proper safety.
- ✦Detail and Precision: Use finishing techniques such as polishing, painting, or powder coating to the piece to enhance and protect the artwork.
- ✦ Investigative Techniques: Use perforations, etching, or layering of other materials to create greater depth and interest.
- ✦ Optimize for Assembly: The components of a sculpture should be designed for easy assembly to reduce the chances of mistakes and enhance speed.
- ✦ Balance Function and Aesthetics: Ensure that decorative elements do not compromise structural integrity if functionality is required.
- ✦ Test Small Prototypes: It’s advisable to construct miniature mock-ups of intricate designs, which, in turn, will enable one to pinpoint what further refinement, if any, adjustments are necessary before the completion of the full piece.
What Are Some Creative Welding Project Ideas for Home Decor?
Designing a Sculpture with Pieces of Metal
When creating a metal sculpture, it’s essential to consider the entire process and think creatively. It is essential, firstly, to pick strong metals that look good, like steel, aluminum, or copper, based on the type of sculpture you want and its size. Before cutting and forming the metal, use design sketches to determine the outline of the structure and the most important features of the piece. Welding is a great technique to make the parts stay together securely, giving the piece stability and accuracy. Apply the final touch to the sculpture by treating it with polishing, painting, or sealing to keep the corrosion away and also to improve the look of the piece. The finished product can be a one-of-a-kind, durable, and artistic home décor item.
Building a Custom Fire Pit
🔥 Custom Fire Pit Construction
Step 1: Choose a Location
For safety purposes, it is recommended to choose a flat, undulated, and well-drained site with no structures, trees, as well as combustible materials within a 10-20 foot perimeter.
Step 2: Gather Materials
Start collecting materials, which include bricks, pavers, and metal. Mark any particular adhesive or mortar that cannot withstand exposure to high temperatures.
Step 3: Prepare the Base
Dump any grass, sticks, and debris in the area and level. A base which is 4-6 inches should be shallowly dug, filled with gravel to stabilize and provide drainage.
Step 4: Construct the Fire Pit
Depending on the shape you desire, arrange the materials in a circle or a square. In layers, pavers or bricks are stacked, while retaining order is bound to maintain the structure.
Step 5: Finish and Test
Stability and uneven surfaces should be burned surfaces as well. Small fires should be burned in order to check the fire pit operation. Regular use can be practiced once the burn is successfully conducted.
Creating a Unique Stool or Planter
🪑 Stool or Planter Construction Guide
Step 1: Select Materials
Select sturdy resources that can endure stress; along with this, you can use wooden planks, concrete blocks, or even metal filets. It; along with the use or intent of the item, should be solid and usable inside or even outside.
Step 2: Design and Cut
Design the stool or planter with the use of basic sketch and design software. Gather the resources and go with the required cutting tools that equip you, and make sure the individual segments of the assembly are adept and congruent with each other.
Step 3: Assemble the Structure
Join the segments together with the use of nails and screws. This engages the utmost adhesion to the components, plus, with the planters, it is essential to create drainage holes at the bottom to keep the water from accumulating there.
Step 4: Finishing Touches
Put the adhesive and screws with the nails to assemble the unit; after this, you can sand the rough areas and paint it, along with a sealant that you think is suitable, and this makes the unit more appealing and sleek, plus it protects it.
Step 5: Functional Testing
You can pour water inside the planter along with soil, and it would be more ideal to put some in the stool too, and only then can you see if there is enough drainage and if the stool can bear the optimal weight to see if all of them are fit to use.
Frequently Asked Questions (FAQs)
Q: What are some easy metal art projects with welding for a beginner?
Welding metal art projects that are simple can be both fun and informative for beginners. A welded metal flower or a decorative wine bottle holder are perfect examples. These projects not only create beauty in your home or serve as gifts but also allow you to practice your welding skills.
Q: In what way can I include scrap metal in my welding projects?
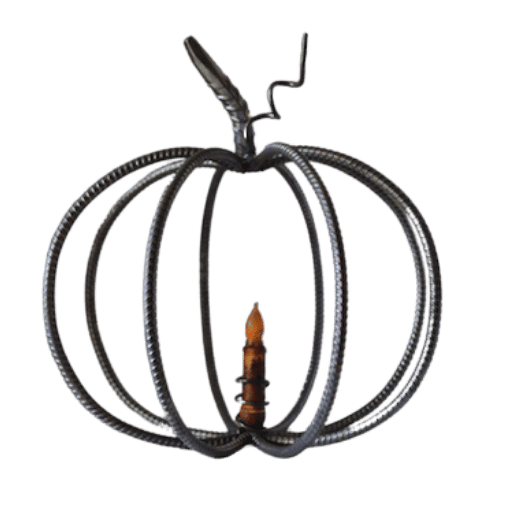
Welding projects will be more waste-free if the use of scrap metal is in the process, and the scrap metal will also give a distinctive touch to your art. You can make sculptures that are not only interesting but also useful, such as a horseshoe Dutch oven holder. The use of mixed metals may even contribute more to the aesthetic of the finished piece.
Q: What basic tools are necessary for DIY welding projects?
The tools that are indispensable for DIY welding projects include a welding machine (either MIG or TIG), a grinder, protective gear, and metal rods at a minimum. If your project is large, then you might also need a cutting tool for metal piece preparation. A properly equipped workshop will certainly make your welding experience a lot more enjoyable.
Q: Is it possible to have welded metal art that is decorative and suitable for indoors?
Definitely! One of the ways through which welded metal can be art indoors is the making of vases or tabletops from welded metal. Projects like these are capable of adding to the beauty of your living space and displaying your welding abilities. Just make sure that the pieces are safe to be used indoors and have no sharp edges.
Q: What are some unconventional designs for a wine bottle holder welding project?
Some unconventional designs for a wine bottle holder welding project may involve incorporating artistic elements such as curves or geometric shapes into the design. Furthermore, using scrap metal is one way to add a more rustic appearance to the product. The holders not only can be good gifts but also make lovely decorations or additions to your home.
Q: What is the best way to gain welding skills through simple projects?
Practicing through simple projects is the best way to gain welding skills. To start with, basic shapes can be your first try, and then you can move on to complex designs bit by bit. Projects like a stool or a fire pit open up a variety of ways to practice welding skills by applying different techniques and simultaneously building up confidence.
Q: Which crafts involving welding are most popular and should be tested?
Artistic freedom in using metal as a source of inspiration leads to a variety of popular welding crafts such as large sculptures, mobile furniture, and decorative items for the home. A welded metal sculpture can add charm to the garden, and a custom furniture piece can be the focal point of your interior décor. These projects can be both functional and artistic, revealing your personal style.
Q: What kinds of materials are best suited for welded metal sculptures?
Steel plates, rods, and scraps are the main materials that will be ideal for creating welded metal sculptures. These strong and tough materials can be easily molded to create a range of shapes and styles. Besides, you can use different thicknesses and textures on the surface of the sculpture to make it more alive and interesting.
📚 Reference Sources
- •
Welding : General welding information and techniques - •
- Wyoming 4-H Welding: What is it really? (University of Wyoming) (University of Wyoming) – Covers welding workshops, production of simple projects like lawn ornaments, and the development of welding skills
- •
Top H Beam Production Line Manufacturer and Supplier in China: Industry resources for advanced welding equipment
🎯 Ready to Start Your Welding Journey?
With these beginners’ projects and complete instructions, you have already equipped yourself with all the necessary tools and knowledge for the start of the welding art journey. Don’t forget to always be careful, make your way up from simple projects and progressively develop your expertise. It doesn’t matter if you produce usable items or just art, every project will be a means to your skill development and imagination expression. Have a great time welding!


